Showing posts with label Before and After. Show all posts
Pantry Makeover! Getting rid of those wire shelves with an Ikeahack

Pantry Makeover! Getting rid of those wire shelves with an Ikeahack

I've always loathed wire shelving in all it's forms... but I do understand why they are used. Lightweight, easy to install, and cost effective - they seem to be the shelving of choice for builders du jour. If you're stuck with unsightly wire shelving - I have the solution for you!

After trying to figure out a way to do built-ins on our own and without custom cabinetry, I turned to the trusted and faithful BILLY from Ikea. Billy comes in two depths (12 and 15 inches I believe), and by choosing the shallower of the two, I not only gave myself some extra space in our walk through pantry, but I avoided the "black hole" - where food items get lost and never used because they are way in the back. You'd never know these are budget bookcases - they look like they were designed to be in a pantry.


 This set up allows for two rows of jars or a bin which makes everything incredibly easy to locate and things don't get lost in Neverneverland. We trimmed out the bottom and the centre (where the two bookcases meet) with some simple baseboard trim to make it look like a single unit. Had we had more time in this house (oh, did I mention we are moving! Another post :) - I would have gone much further like some of the Billy built-ins I found on Pinterest and put crown on the top to really give it that built-in look. I also might have wallpapered or stenciled the back, but I was far too indecisive to settle on anything.


Before our pantry overhaul, my pantry sadly looked like this (can't believe I'm sharing this!).


Granted, I knew we were ripping it all out so I didn't invest any time in making it pretty - seriously, how big of a transformation is that?

Taking out the wire shelving, patching and painting was a bit of a task (the wire shelves were anchored with some pretty serious drywall screws) - but my husband and father-in law tackled it like pros.


I customized my shelf heights to the heights of my jars and was so happy how it all worked out - another big plus about this project is how easy it is to adjust shelf height to accommodate different sized items - something you can't do with wire shelves.


Despite the depth being absolutely perfect for this project, the width did not line up perfectly. I toyed with the idea of building in an extension so the pantry fit the entire width of the space - but instead opted for a chalkboard diy wine shelf (upcoming post!). The little gap (just less than a foot) was good for putting large Costco acquisitions before I had a chance to properly put away, but could also have used it to store a broom or a small foot stool.


While the pantry doesn't always look as clutter-free as these images, the reality is pretty darn close. I've found it really easy to maintain when you have a home for everything. I wanted to redo my labels prior to this post, but with the move ahead just didn't have the time. These labels are going on 2.5 years and still kicking - although some have definitely seen better days. I'm still amazed at how long they've held up though!

Have you ever used a Billy in a non-bookcase way? Do you have wire shelves you hate as much as I do?
Master Makeover: The Reveal!

Master Makeover: The Reveal!

I hesitate to ever call a room "done" because it is always an evolution. So, other than the fact that there are likely new bedside tables, side lamps and pillows in the foreseeable future, I am still calling this room "done" (for now). It actually is probably one of the most finished rooms in our house, so that helps me get past the little things I would like to change but have to save for.

For the moment, our master bedroom looks like this:


What did we (erm, the hubby) do to take the room from THIS:


Above: BEFORE

To THIS?:
 Above: AFTER

Well, here's the list and cost breakdown:
  • Removed wallpaper, wallpaper paste and painted walls grey (Cost: $150)
  • Trimmed out the windows with 2.5 inch white trim and then painted the inside to create "faux" window casings (Cost: $30)
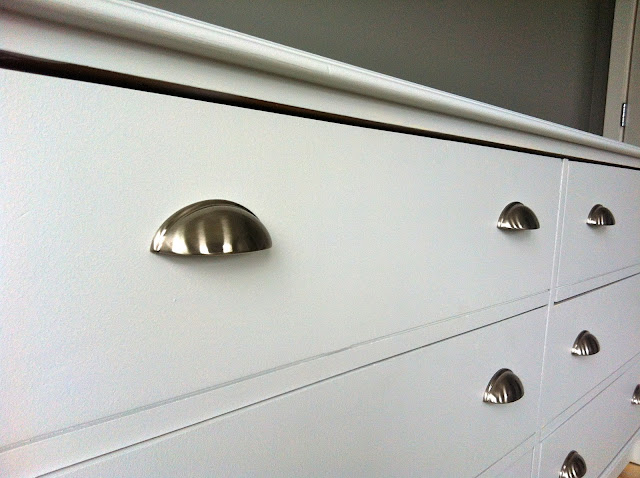
  • Painted "free" craigslist dresser a light grey, trimed out the scrolly toe kick with a piece of wood, and replaced the hardware on the drawers (Cost: $30)
  • Painted the espresso legs of the bench white, and sewed a grey slipcover to cover the old mocha microfibre (cost: paint $0 (on hand), upholstery fabric $3 (had on hand but purchased a couple of months ago at a designer warehouse sale)
  • Switched out old headboard for a grey upholstered one. It used to be a window seat in it's previous life at a show home, but for now it is our headboard. One day it may end up as a window seat again under that large window we have. (Cost: $8 at designer sale)
  • New mint and white bedding (Cost: $20 from warehouse sale)
  • Sewed floral pillows (Cost: $3 for fabric from warehouse sale)
  • Hung faux roman shades (Cost: $15 for velcro, wood was on hand, faux roman shades cost $24 for all three from warehouse sale last year)
So, just under $300 for the entire room makeover. Not too shabby, hey? Thank goodness for my designer sale scores! When I set out to do this room, I made a promise to myself to use as much of my warehouse sale finds as possible. I bought quite a lot of stuff, and I have half a craft room full of things I have yet to use (including about 20 roman shades), and so in the interest of saving money AND clearing out some space, I forced myself to work with what I had. And I am pretty darn happy I did. 

For the first time in 2.5 years, I can say I actually love spending time in our bedroom. I now bring my iPad up to bed and like to curl up and watch TV on our not as nice TV in the bedroom just so I can immerse myself in the energy I feel while I'm in there. Man, it makes such a difference!

Here are some of the details..


Marble Torre & Tagus box from warehouse sale for some of my watches.

An Umbra soap dish used for my little pretties.

New lamp shade still to be added, but this is the entertainment side of the bedroom.

I am NOT a seamstress, but somehow I found a way to sew this slipcover. It's not perfect, but I like it. It works. I've been wanting to paint this espresso bench with mocha fabric FOREVER and so glad I finally did! Ok, the hubby painted it but I sewed the slip cover!


 The fabric for the pillows was an awesome find at the most recent designer warehouse sale I attended (I got that fabric, the bench fabric and the bedding all there). The floral pattern is lovely and adds just the right pop of colour. The mirror looks much bigger in person than in this photo, but it's still something I'd like to replace down the road.


Ahh peonies. My fave. Waking up to the smell is just divine. And of course a kissy shot of my hubby ain't too bad to wake up to either!


And again, the whole room complete. I wil try and do some posts on the faux window casings and put up some better pictures because you can't really see them in these photos. They were so cheap and easy to do, and make miles of difference!

Oh, and the paint is from Cloverdale Paint (in Canada) and it's called Excalibur. To be honest, I wish we had gone a touch lighter and a touch greiger, but I am not going to dwell on that. I am just happy to finally have a painted bedroom!

Looking back at the before photos, I can't help but ask myself "WHAT was I thinking???". I am SO happy to check this off the list!

Whaddya think?

xo J
Master Makeover: The Dresser

Master Makeover: The Dresser

Our master bedroom is SO CLOSE to being done and I am getting very excited to share it! I'm hoping to have it wrapped up in the next week or two. I've still got to sew pillows, and reupholster and paint the ottoman, build brackets for my roman shades, hang roman shades and art, and then we will *sort of* be done!

I want to wrap up some of those projects before I show a picture of the room/bed but for now you can get a sneak peek of the wall colour we just painted. As a refresher, our master used to look like this.

Anyhoo, before you get to see the dresser makeover and wall colour, feast your eyes on this beauty.


Sorry for the terrible photo, but it's the only before photo I have. I found this narsty dresser on craigslist for free. We needed a new dresser, and this one seemed to have some potential. We picked it up and it was about 1000 times heavier than I thought. Even without the drawers.

I was excited to get to work on it, so I used my electric sander and gave her a nice buff. The top was a varnished laminate and I decided that removing the varnish would be too much work, so I just sanded that as well and painted over it. I'm not a "by the books" painter so probably don't follow my lead. I definitely cut corners when it comes to painting furniture, especially free furniture, because I'm just not that attached to them.

I painted the body in the garage, and took the drawers out in the backyard to sand and spray paint.

Then this happened.


Our fur baby Sadie wanted to come play with me in the backyard while I worked away on the drawers. They were standing up so that the face of the drawer was pointing towards the sky, and balancing on the back on the cement patio. Long story short, a drawer fell down and crushed my little girl's foot. It was so heartbreaking hearing her cries and watching her hobble away. I can't even bare to think about it. Must. Stop. Now.

Anyways, along with the emotional pain of injuring her, we also were burdened with the financial pain of fixing her. Almost 500 beans.

This resulted in our "free" dresser costing us $500. In the back of my mind I couldn't help but think if I had just gone out and bought a dresser I actually liked I wouldn't have a broken wiener dog, but oh well, c'est la vie!

Back to the dresser. I used Antique White to paint the body and sprayed using the same colour for the solid wood drawers. Then I spray painted the original handles black to update the look a touch. It was okay. Meh.

I was too exhausted (and too upset from doggy-gate) to do anything else, so into the room she went. Didn't love it, but it did the trick.

When time came to update our bedroom, I knew I wanted to do something with the dresser. I found these pulls on ebay for $1.79 a piece from the Knob Shop.


They are AMAZING. I really love them, and they shipped to our US mailbox in a day. Seriously.


So I tried them out. What a difference! They really changed the whole look of the dresser.

Then I realized I only ordered 6. A bit of a blonde moment; I counted 6 drawers and ordered 6 knobs. Doh! I ordered the rest and again, they shipped insanely fast. Thank you Knob Shop!

Then life took over so I lived with the dresser looking like this for a week or so. I discussed with hubby about painting it white. He suggested a light grey. Mostly because we were out of white paint and we had light grey left over from our bathroom. Sure, why not?

I also thought a quick update would be to cover the curvy toe kick. A piece of wood nailed on and painted would make a world of a difference. I had my plan, just needed to find the time to do it (story of my life!).

Last night I was at a friend's for a Bachelorette viewing party, and when I came home, my hubby had done this.


He propped up the dresser so it could be painted in our room (waaaay too heavy to move back to the garage again) and he painted away in the light grey paint. He also covered the toe kick with the wood and replaced all my pulls.


 It's obviously not a perfect piece of furniture (note the uneven gaps) but can be fixed if we tighten up the tracks a bit I think). It just looks SO much better than that free $500 dresser looked a year ago. Want to see again? Not really? Too bad, here it is.


I will definitely take some more pics once it's cured and once I've had a chance to style it a bit. We have a big bulky TV that usually sits on it so I'm hoping I can get the hubby to wall mount it so it's out of the way. I'm just happy that I can finally say that I like our dresser. And it restores a bit of my faith in getting things from craigslist. Well, as long as you keep your animals out of harms way of course.

xo J