Showing posts with label Personal. Show all posts
Garden Party First Birthday

Garden Party First Birthday


Oh hi there! It's been a good six months since we've posted, but hey, we do this for fun and not for work, and sometimes blogging isn't fun when you'd rather just watch Netflix and drink wine. Which for me, is most of the time. Tonight I decided that watching the Bachelor was a bit too vapid for my full attention so I'm multi-tasking with blogging and feeling pretty good about it.

In September my little nugget turned one (WHERE THE HECK DOES THE TIME GO?!?!), and coming up with a theme was a monstrous task for me. I started planning when she was about 4 months old and by the time the party was within sight, my little "Parisian cafe" theme had morphed into recreating an entire streetscape in Paris complete with working cafe, flower shop and bakery. NUTSO, I know. Having a custom street facade built, sourcing out glass display cases for the bakery, and trying to find multiple kids-sized wrought iron and marble bistro sets was literally the end of me. I just quit. I told my husband that I couldn't do it. Quinn didn't need a birthday party, did she? I mean, she's one. She has no clue what's going on. And that's true. But as he reminded me, this party was for me. This was also a celebration of my first year as a mother, and he was right.

A few weeks passed where I legitimately didn't want to do anything. If I couldn't recreate Paris, I didn't want to have a party at all. And then I felt bad; after months of pouring energy into creating parties for this blog, and for friends, and for friend's friends, I didn't want to look back and say that I used all of my party planning energy for others and then didn't have anything left for my own daughter. That just felt awful to me. But I had also reached burn out level and the idea of doing everything I would normally do was overwhelming.

So I did what I could to create a memorable party without going overboard. I scratched many, many things off my list during the planning process, and despite knowing that I could have done so much more, I'm glad that I didn't. Because, sometimes taking a new direction and trying to make a party "low key" can actually turn out pretty fabulous. And thankfully for me, I have some really talented friends who made it all possible.

 I'm happy with how everything turned out, but above all - that we had such an amazing day with our closest family and friends celebrating the most loving and wonderful little girl that I get to call mine.

More details on the party at the end of the post. Enjoy my mostly non-edited, poorly lit photos - because if we wait for me to edit them, well, I'll never post them :)


I definitely couldn't have pulled this party together without the flower wall backdrop from our sort-of sister company Flowerwall Vancouver (it's a sort-of sister company because it's "Party Society" Kristin and her sister's company if that makes any sense at all). It really did help me decide on the final direction I wanted to go in, and set the scene for the day.

Our good friend Janet at Pete's Sister Creative gifts did the cakes (well, the main cake was a bit of a DIY project for another post) and the always amazing macarons. We actually had two parties (one for friends and one for family) since the guest list was so large, hence why we needed so many cakes.

And, two awesome friends of mine from my mommy group contributed their skills/wares - the restored vintage highchair and the birthday crown (if interested, message me for their details!).

SOURCES:
FLOWERS: Thrifty's Flower Shop
"ONE" BALLOON Cheers & Co
CAKE STANDS: Homesense
West Coast Welcome Home | Wine & Cheese

West Coast Welcome Home | Wine & Cheese


When Kristin told me she wanted to host a welcome home party for me, I naturally declined. Despite my love for throwing parties, I'm not all that into being the guest of honour. But, she twisted my arm a bit (all she had to say was wine) and we decided to make the event a really special way to say goodbye to Manitoba (where I lived for almost three years) and hello again to BC (where I spent my entire life prior to Manitoba, and came back to for good).


While in Winnipeg I had the pleasure of getting to know one fabulous soul and artist - Kal Barteski. You've likely seen her work without even knowing it if you don't already know her - and if you do, you know how lucky it was for me to become acquainted with her! She truly is a special spirit with a massive heart - one of the nicest people you will ever meet with a wild passion for art and animals (in particular, polar bears). Kal has loaned her script to Vancouver Urban Winery for some pretty fantastic label art - so featuring VUWxkbscript seemed like the perfect way to bridge my Winnipeg experience and my coastal home. (Vancouver peeps - she's coming for a custom #kbscript pop-up at VUW next Monday June 6th! See you there?)


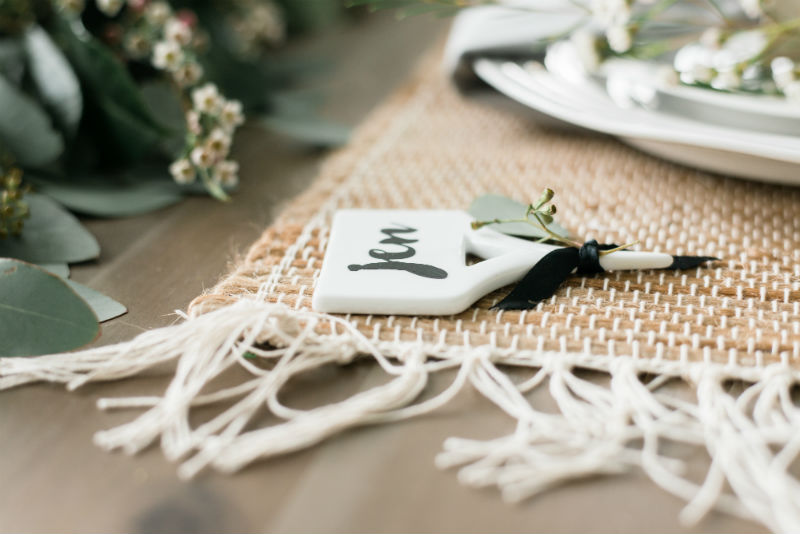
The name cards were fun to do and oh so easy. We used our Silhouette Cameo to cut out the names on black decal material, and used these ceramic Pottery Barn cheese markers as name cards.


The gorgeous eucalyptus garland from Celsia, and natural tablewares from Pier 1 helped bring together that breezy, natural West Coast vibe. And, to make it truly a "catered to Jen" affair, we tracked down a delicious collection of Vancouver-made dairy-free nut cheeses by Blue Heron (thanks to a shout out from local foodie Erin Ireland). I've been plant-based for the last few years and despite Kristin being far from it, she was happy to take on the challenge of creating a vegan cheese board. We will be posting the cheeseboard and more details on the nut cheese later this week for those interested!


To tie it all together, my personal and custom #kbscript (more of Kal's beautiful handwork) was a focal point as it really does just the perfect job at summing me up (and this wine and cheese party)!

WINE: Vancouver Urban Winery
TABLE: Restoration Hardware
CHAIR RENTALS: The Little Wedding Shoppe
GARLAND: Celsia Florist
PLACEMATS, NAPKINS, AND NAPKIN RINGS: Pier 1
ART: Kal Barteski
MENU: The Paper Society
NUT CHEESE: Blue Heron
PLATES: Sophie Conran

April showers bring May Flower Crowns

April showers bring May Flower Crowns


When Cinco de Mayo and Mother's Day fall within a few days of each other, you don't say no to mom and baby flower crowns. These stunning creations by Flower Factory were all that we hoped and more. The most stunning peonies and ranunculus really stole the show here. And these colours? Literally, the best! And, while a formal introduction will soon follow - this beautiful lady is none other than my other half here at the Party Society - meet Kristin and her gorgeous daughter Bianca (her son Sammy wasn't going to have anything to do with flower crowns).


Pantry Makeover! Getting rid of those wire shelves with an Ikeahack

Pantry Makeover! Getting rid of those wire shelves with an Ikeahack

I've always loathed wire shelving in all it's forms... but I do understand why they are used. Lightweight, easy to install, and cost effective - they seem to be the shelving of choice for builders du jour. If you're stuck with unsightly wire shelving - I have the solution for you!

After trying to figure out a way to do built-ins on our own and without custom cabinetry, I turned to the trusted and faithful BILLY from Ikea. Billy comes in two depths (12 and 15 inches I believe), and by choosing the shallower of the two, I not only gave myself some extra space in our walk through pantry, but I avoided the "black hole" - where food items get lost and never used because they are way in the back. You'd never know these are budget bookcases - they look like they were designed to be in a pantry.


 This set up allows for two rows of jars or a bin which makes everything incredibly easy to locate and things don't get lost in Neverneverland. We trimmed out the bottom and the centre (where the two bookcases meet) with some simple baseboard trim to make it look like a single unit. Had we had more time in this house (oh, did I mention we are moving! Another post :) - I would have gone much further like some of the Billy built-ins I found on Pinterest and put crown on the top to really give it that built-in look. I also might have wallpapered or stenciled the back, but I was far too indecisive to settle on anything.


Before our pantry overhaul, my pantry sadly looked like this (can't believe I'm sharing this!).


Granted, I knew we were ripping it all out so I didn't invest any time in making it pretty - seriously, how big of a transformation is that?

Taking out the wire shelving, patching and painting was a bit of a task (the wire shelves were anchored with some pretty serious drywall screws) - but my husband and father-in law tackled it like pros.


I customized my shelf heights to the heights of my jars and was so happy how it all worked out - another big plus about this project is how easy it is to adjust shelf height to accommodate different sized items - something you can't do with wire shelves.


Despite the depth being absolutely perfect for this project, the width did not line up perfectly. I toyed with the idea of building in an extension so the pantry fit the entire width of the space - but instead opted for a chalkboard diy wine shelf (upcoming post!). The little gap (just less than a foot) was good for putting large Costco acquisitions before I had a chance to properly put away, but could also have used it to store a broom or a small foot stool.


While the pantry doesn't always look as clutter-free as these images, the reality is pretty darn close. I've found it really easy to maintain when you have a home for everything. I wanted to redo my labels prior to this post, but with the move ahead just didn't have the time. These labels are going on 2.5 years and still kicking - although some have definitely seen better days. I'm still amazed at how long they've held up though!

Have you ever used a Billy in a non-bookcase way? Do you have wire shelves you hate as much as I do?
Designing a Home | Finding a Style

Designing a Home | Finding a Style

Just 16 more days until we are into the new house. Excited doesn't even begin to capture how we're feeling. But, as the move in date creeps up, as does my self-imposed timeline to figure out how to decorate this blank canvas.

This layout below is very similar to ours (just cut the island in half, take out the coffered ceilings and the beefy trim.. oh and almost everything else! But you get the idea).

What I love about this photo is that it's not pigeon holed into a style. The cabinets and mouldings and door style are all very traditional, yet the furniture is modern and simple. It's the definition of transitional design, and it's what I'm hoping to achieve with our home.


Although the style below is pretty far from my own, I'm including it as a reminder for me to inject some colour in my space. I usually gravitate towards neutrals but look how happy this space is! I just love it.


The opposite of colourful, the style below blends so many textures that it conveys warmth in a different way (let's be honest, I probably won't inject much colour and will end up with more neutrals no matter how hard I try).


 I've always loved a little art deco or hollywood regency glam. It doesn't need to be done throughout nor overwhelming to make an impact.


But, I also love the modern, clean line of this condo design. Do you see what I'm going here?


And this space is just to.die.for.


Okay, if you're still with me you've probably acknowledged that I have design ADD and I love about a million different things and styles. Hence why we are 16 days out and I'm still agonizing how to tackle the house. SO much pressure on myself to make it perfect. Right now, I'm just hoping to get our stuff in there and take it one day at a time. It's hard to know what to do with a space unless you'd lived in it, right?

If you have, how did you figure out your "style"? HELP!