Showing posts with label house. Show all posts
Pantry Makeover! Getting rid of those wire shelves with an Ikeahack

Pantry Makeover! Getting rid of those wire shelves with an Ikeahack

I've always loathed wire shelving in all it's forms... but I do understand why they are used. Lightweight, easy to install, and cost effective - they seem to be the shelving of choice for builders du jour. If you're stuck with unsightly wire shelving - I have the solution for you!

After trying to figure out a way to do built-ins on our own and without custom cabinetry, I turned to the trusted and faithful BILLY from Ikea. Billy comes in two depths (12 and 15 inches I believe), and by choosing the shallower of the two, I not only gave myself some extra space in our walk through pantry, but I avoided the "black hole" - where food items get lost and never used because they are way in the back. You'd never know these are budget bookcases - they look like they were designed to be in a pantry.


 This set up allows for two rows of jars or a bin which makes everything incredibly easy to locate and things don't get lost in Neverneverland. We trimmed out the bottom and the centre (where the two bookcases meet) with some simple baseboard trim to make it look like a single unit. Had we had more time in this house (oh, did I mention we are moving! Another post :) - I would have gone much further like some of the Billy built-ins I found on Pinterest and put crown on the top to really give it that built-in look. I also might have wallpapered or stenciled the back, but I was far too indecisive to settle on anything.


Before our pantry overhaul, my pantry sadly looked like this (can't believe I'm sharing this!).


Granted, I knew we were ripping it all out so I didn't invest any time in making it pretty - seriously, how big of a transformation is that?

Taking out the wire shelving, patching and painting was a bit of a task (the wire shelves were anchored with some pretty serious drywall screws) - but my husband and father-in law tackled it like pros.


I customized my shelf heights to the heights of my jars and was so happy how it all worked out - another big plus about this project is how easy it is to adjust shelf height to accommodate different sized items - something you can't do with wire shelves.


Despite the depth being absolutely perfect for this project, the width did not line up perfectly. I toyed with the idea of building in an extension so the pantry fit the entire width of the space - but instead opted for a chalkboard diy wine shelf (upcoming post!). The little gap (just less than a foot) was good for putting large Costco acquisitions before I had a chance to properly put away, but could also have used it to store a broom or a small foot stool.


While the pantry doesn't always look as clutter-free as these images, the reality is pretty darn close. I've found it really easy to maintain when you have a home for everything. I wanted to redo my labels prior to this post, but with the move ahead just didn't have the time. These labels are going on 2.5 years and still kicking - although some have definitely seen better days. I'm still amazed at how long they've held up though!

Have you ever used a Billy in a non-bookcase way? Do you have wire shelves you hate as much as I do?
The House is Done and We are IN!

The House is Done and We are IN!

Guys!!!! We are IN! Words cannot explain the feeling of finally being in our house. It felt like it took forever, but the final two months just flew by and before we knew it we were signing on the dotted line and turning the keys to our home. It was a total whirlwind having just come back from vacation, and getting everything done in between Christmas and New Years. In the span of two days we had about 15 different people in and out of our house from deliveries to installations to electricians (which we are super thankful for since so many people are off over the holidays) - but, it is done and we are "home" now.

I can't wait to share more pictures, the long promised floor plan, our experience so far with the finishes we chose, and everything we still have yet to do (like the backsplash, fireplace tile and paint). I just need to unpack the "real" camera so I can take some proper pics next weekend. I will just say it because I've been obsessing over them for the past 4 days, but I am overjoyed with my marble island. I am so in love with it and so thankful I took the risk.


For now, here's a quick insta pic (if you want to follow along as I post more house pics, you can find me at http://instagram.com/thepapersociety ).

And for those who ask if two people really need a double wide fridge - YES we do :)

Designing a Home | Finding a Style

Designing a Home | Finding a Style

Just 16 more days until we are into the new house. Excited doesn't even begin to capture how we're feeling. But, as the move in date creeps up, as does my self-imposed timeline to figure out how to decorate this blank canvas.

This layout below is very similar to ours (just cut the island in half, take out the coffered ceilings and the beefy trim.. oh and almost everything else! But you get the idea).

What I love about this photo is that it's not pigeon holed into a style. The cabinets and mouldings and door style are all very traditional, yet the furniture is modern and simple. It's the definition of transitional design, and it's what I'm hoping to achieve with our home.


Although the style below is pretty far from my own, I'm including it as a reminder for me to inject some colour in my space. I usually gravitate towards neutrals but look how happy this space is! I just love it.


The opposite of colourful, the style below blends so many textures that it conveys warmth in a different way (let's be honest, I probably won't inject much colour and will end up with more neutrals no matter how hard I try).


 I've always loved a little art deco or hollywood regency glam. It doesn't need to be done throughout nor overwhelming to make an impact.


But, I also love the modern, clean line of this condo design. Do you see what I'm going here?


And this space is just to.die.for.


Okay, if you're still with me you've probably acknowledged that I have design ADD and I love about a million different things and styles. Hence why we are 16 days out and I'm still agonizing how to tackle the house. SO much pressure on myself to make it perfect. Right now, I'm just hoping to get our stuff in there and take it one day at a time. It's hard to know what to do with a space unless you'd lived in it, right?

If you have, how did you figure out your "style"? HELP!


Designing a Home | Balls to the (Dry)wall

Designing a Home | Balls to the (Dry)wall

I can't believe I haven't shared more house build things on here. I guess it's just felt like such a long process and it's taken a while to really see the house take shape to a point where it feels real. Well, folks, it feels real! The drywall is in and as I was leaving the other day they were about to prime the walls - eeek!

I'm sure nothing will top finally getting to see the kitchen in -  right now bare walls don't feel so homey. But it is still incredibly exciting to see.

Below is our front hallway - Kevin is standing in the laundry/craft room and the second opening is the door to the basement. If you turned right after the right hand wall, the hall would lead you to the powder room and mudroom (garage entry). Straight ahead is the great room with the living room on the left and kitchen/dining room to the right.


Don't mind the scaffolding, but below is the living room (I should have stepped back to get a wider shot). Out the back, we have our yard, then there will be fence, then a back lane, and then some "lane style"" homes. We liked the buffer that the back land provided, and if we want, we could put a gate in the back fence for future yacht storage (yeah right).


Without the scaffolding and prior to the fireplace hole being cut.


This view is from the other angle (I'm standing in between the kitchen/dining room for this shot.) As you can see, plenty of natural light which is exactly why we chose so many windows. We will have to wait and see how that plays out with heating and cooling in the home. 


Below is the kitchen. The two small holes in the ceiling are our island pendants to give you a better idea of placement. This wall will have our stove centered on it and cabinetry on either side. To the right is the walk-through pantry (of which another blog post is to come) and on the 90 from there, is our fridge and pantry wall.


And here is the dining room. I was really really concerned about not having a window on the far right wall of the dining room or in the kitchen (since the sink is in the island, and the stove is on the wall, I wasn't sure where to put one without drastically changing the configuration). But, after seeing how much light the home gets, I'm not all that worried anymore. One day, I will do a post on things I learned while building a home and what I wish I had changed/done, but that may be a ways away.


Below is the fireplace with the beginning of the cut out for our 60 inch fireplace. Although our home came with a standard gas fireplace, we opted to omit it in favour of a modern ribbon fireplace (which will be electric). The gas version of the fireplace we wanted was atrociously expensive (many thousands) and we were more concerned about looks and ambience than the gas heat (which is expensive to run if you are looking to heat a room). How we are finishing the fireplace is still very much up in the air. We went to a tile store yesterday and there were so many options that I am beyond overwhelmed. I do still have my white stacked quartz that would be perfect BUT I don't have enough of it to cover the roughly 100 sq ft of the fireplace. Options and a request for your opinion to come in another post!


Look at how happy my hubby is. The cutest. Although this process has been stressful and exhausting at times, this man has kept me sane and his enthusiasm for this build might even surpass mine. Best of all, he loves (most) of my design choices which makes it that much easier. To help even things out a bit, he took the reigns on the exterior and fortunately we are both happy so far!


And there she is in her most recent state! We have hardiboard up to the part where it is finished, and will have acrylic stucco on the unfinished parts (and for my BC friends, stucco is THE main exterior finish of choice in Winnipeg, so although it might seem odd for us to be doing it, it makes sense regionally). And the door has yet to be painted (and because it's already freezing here, it won't be painted until, oh, next summer probably.)


Hope to post soon with our floor plan FINALLY. I really want to design the floor plan on floorplanner.com as opposed to just scanning the plans, so that I can show furniture layout, etc, but I just haven't found the time.

Ciao lovelies!
The Perfect Home to Renovate

The Perfect Home to Renovate

Every once in a while, on a lazy Saturday morning over a soy latte, I start thinking about where we would be had we not moved to Winnipeg and weren't building a new home. We had already started thinking about moving before we got transferred here, so it's likely we would have been on our way to a new-to-us home anyways. And so, I look around on MLS. I look and see what's out there. What might we have bought? Would we have stayed in our preferred area (where we lived before) in a new, smaller home, or would we have moved out further and to an older, larger home?

While going through our imaginary house-searching, I came across this gem. It needs A LOT of work, but it doesn't take much imagination to see what potential it has. I can't even venture to say how much a total renovation would cost, but I feel like $200K would improve this home significantly. I would paint the exterior grey and white, practically gut the interior, paint out all the wood white, replace the kitchen, bathrooms, railings, and flooring - and I think it could be a pretty spectacular place.

This property checks off so many boxes for me:

  • Interesting and unique exterior
  • Large, private, treed in lot
  • Open floor plan
  • Vaulted ceilings
  • Walk-out finished basement
  • 4 bedrooms
  • Priced low enough to allow for substantial renos (under $550K)
Of course, there's no knowing what condition the house is in, what other things might need attention. Who knows if that fireplace is up to code or if the roof needs to be replaced. But, from a purely superficial standpoint for the purpose of dreaming, this baby is a winner. 


I really love the way this house/garage is laid out. Although it's not huge, it definitely seems a tad more impressive laid out in such a way.


Just imagine white painted walls, a new fireplace and reclaimed wood floors. 


There isn't a ton of kitchen space to work with, but starting from scratch I would extend the kitchen all the way to the door frame, omit the half wall, and add an island facing the living room.


The open concept and vaulted ceilings are what really do it for me. This is actually a very similar layout to the house we are building. My husband has already remarked that he doesn't know how easy it will be to go from a living space with vaulted ceilings to one without when we ever leave, so this type of layout would solve the problem.


It's really hard to tell how this master loft suite could be used based on the current situation, but there seems to be enough space to work with to do something amazing. I am not sure, but it looks like it could be missing an ensuite, which would be a very expensive addition. There are apparently two bedrooms on the main level, which I would consider joining to create a master suite, and then separating the loft into two bedrooms. One thing is for sure, those dark beams would really pop if the panelled walls were painted white.


The backyard is full of potential with a great expansive space enclosed by shrubs and trees. Pool, anyone?


Even the entry is inviting, bordered by trees.


And now for some inspiration:


I really like this modern/industrial take on painted wood panels.


Probably the easiest and most effective way of transforming the house in question - paint everything white.


And more dreamy white lofted spaces.

Love this weathered grey look for the ceiling as an alternative to all white.


This is a great kitchen layout that could work for the house (scaled down in size).

Voa Houzz

Although different in style, I feel like grey paint with white trim and wood accents would really complement this house.


So what do you think? Would you ever tackle a big reno like the above, or would you rather move into a completely finished home? Unfortunately for me, my husband have completely different ideas of what we want in a home (he wants new new new, I want old and in need of some love!).
Designing a Home | Kitchen Selections

Designing a Home | Kitchen Selections

When it comes to finishes, it's probably no surprise that we've gone for a very white and neutral scheme. Here's a breakdown of our kitchen choices and some of our inspiration.

After many sleepless nights and countless naysayers, we pulled the trigger on a Venatino marble surface for our 9 ft island. Not only am I over the moon about this decision, but hubby is more than on board! Once he saw the samples and the depth and life that marble has over other surfaces, he was sold. It is such a beautiful stone and I know it will be my favourite part of this house. Hubby keeps seeing marble surfaces on TV and in restos/cafes and is almost as excited as I am. The perimeter counters that flank the cooktop are a snow white quartz that will be durable and also a nice break between the marble island and the marble backsplash. 

We chose maple wood cabinet doors painted in Alabaster (similar to the style above but a tad different and little bit creamier than this white) and charcoal vinyl plank floors. We chose a luxury vinyl plank (looks like laminate or wood planks but is made out of very durable man made material) because we have lived with both laminate and hardwood and wanted a more durable option. Our laminate floors were horrible, all three sets that we've had. Any amount of water made the seams swell, which means cleaning without water is a tedious task. Hardwood isn't great for our dogs (unless it's really rustic and grooved) because it's slippery for them and with the back issues we just didn't want to risk it. This vinyl plank is perfect - it's durable, waterproof, and if there ever were damage the individual planks can be replaced fairly easily. But best of all, there's a grippy texture that will help loads when our pups want to run around and play. It's about the same cost as laminate and some entry hardwoods at an upgrade cost to us of about $6500 from the standard lino sheet flooring that is included in the base price.

Our lighting is still in the works, but I'm hoping to go for this style of pendants over the island (This kitchen layout is VERY similar to ours) with 6 pot lights overhead and under cabinet lighting.


We also plan on having a built-in hood fan constructed after we move in (DIY project via father-in-law) but until then we have a sleek stainless steel hood fan that isn't bulky or obtrusive.

Hardware will be classic with small shiny chrome knobs on the doors and a classic chrome pulls on the drawers.

Backsplash will be done immediately after we move in because I am far too indecisive to make that decision now (because obviously I will change my mind). We are going to go for a marble tile (likely a 3 by 8), I just haven't decided whether I want subway or herringbone ala this dreamy kitchen.


We are very excited about the fridge, going with an all fridge, all freezer option. I'm sure it seems excessive as we are just two people, but if you saw our fridge/freezer you would understand. We spend well over $200 a week on produce alone, so you can only imagine how full our crispers must be. I also freeze loads of meals and ingredients since my vegan dishes are often far too large for one person. Freezer storage is my saviour and allows me to make healthy meal and snack choices when I don't have a lot of time. If there is one appliance we need to be above and beyond the everyday, it's the fridge.


We thought long and hard about our stove top. In our rental house here we got to experience gas for the first time (a really nice GE profile gas range). I love the look of a gas range, I love the feeling of the flame...but, after a year with it I just didn't love the maintenance (funny, considering I'm willing to take on the maintenance of marble countertops!). I just found that under the grills got dirty every single day, and it wasn't an easy clean up. The little black disks where the burners are also got splattered/stained easily.  It looks pretty from afar, but far from pretty up close. I also didn't see any difference in cooking time from any of the other stove tops I've used in the past. So we are going with a modern looking Samsung glass cooktop and I'm happy about the choice.

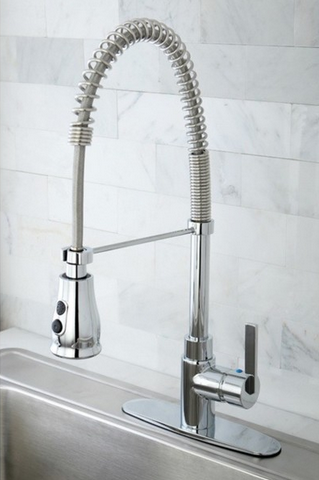
Our facet looks similar to this style, with an oversized, undermount rectangular sink.


Micro will be built in under the counter in the island along with the dishwasher. 

And what about a pantry you ask? Being the pantry freak that I am, I have THREE pantries. We selected two wall pantries to flank either side of the fridge, and then we have a walk-through pantry connecting the kitchen to the mudroom (think butlers pantry style, although smaller and without cabinetry and a sink). I can't wait to replace the wire shelving in the walk-through with solid wood shelving, and to organize and label all of my jars. It might take me a week, but it will probably be one of my favourite things!

I will try and get a floor plan up so you can see everything in context - and will post about the other finishes sometime soon too! If you're building or re-decorating, how's it going?


Designing a Home | Final Decisions and Marble Countertops

Designing a Home | Final Decisions and Marble Countertops

** skip to the bottom of this novel on our house build for photos and countertop info**

If I were to be compensated hourly for my in depth countertop research, well, let's just say I wouldn't need a job. My brain hurts. I'm not sure how much longer I can look at a screen and maintain my eyesight. I might be losing my sanity.

Yesterday marked the day where we had to have ALL of our house decisions in (well, except for the lighting, thank goodness). It feels like forever since we first wrote our contract on our house build (January - but then changed our lot and plan in early February). Here it is, mid- July, and we have a basement. It's seems at once both an incredibly slow process and a quick one. I started picking out my finishes last August before we even bought, and nearly a year later, here I was, still stumped by some decisions.

There are lot of factors for us to consider. How long we will be in this house (not long). Will everybody love our design choices for resale's sake (probably not). Will spending buckets more mean we will get buckets more (probably not). Do I want to make decisions based on the fact we may sell it in a few years and forgo my own desires (not really).

At the end of the day, we don't know what the future holds, what this market will be like, what the design trends will be, nor what people will like. We could be here for longer than 4 years, and in that case, it would be ashame to make decisions based on resale value. And really, if I were to look at 95% of the homes on MLS right now, none of them are my style. Which also means that my style may not please 95% of buyers. Oh well, c'est la vie. It's my house and I'll do what I want to (please make sure to sing that line in your head while reading or it comes across horribly bratty).

The plan is to design this home to our taste (I guess I should say MY taste because my amazing hubby is really letting me take the reigns) and not overspend. There are definitely things that I would do in our "forever" home that we are not doing with this home. But, things can always evolve. If we are in the house for a while, there's no saying we can't upgrade as we go. We are upgrading nearly every single thing from the base options, but for some we aren't going crazy. Our ensuite comes with a tiled soaker tub, a basic one-piece fibre glass shower, and a vanity with a single sink (base includes basic lino flooring, basic laminate countertops, etc). We are upgrading the cabinetry, the countertops, adding a dual sink (WHY on earth do builders think one sink in an ensuite with a large vanity makes any sense at all?), flooring, and tiled tub surround. To upgrade to a tiled frameless glass shower was going to be around $10,000. Yup. I also really wanted a free standing tub, but it's another item that I cut off the list as soon as we realized our upgrades were getting up there. Like, our upgrades cost almost as much as the lot. Yup. Crazy.

Okay, back to the countertop research. I *thought* I had my mind made up. I *thought* that I was going to be happy as pie with my stark white countertops and marble backsplash. And then as soon as it came time to schedule our design meeting to make the final choices, I started thinking about marble again. What if I just put in on the perimeter? Then I could do a white backsplash and still get some marble counter love. Or... what if I did it on the island? Oh my, that would be beautiful. That would just make the kitchen. It would just make the house. What if.

And so the wheels started turning again and I decided if I was going to forgo my hearts desire, I should at least really give it a fighting chance and look into it as best I could (again). This time, I supplemented my online research with a visit to a slab yard, and some rigorous sample testing. I could recap all of my marble tests in great detail, but there are so many available online, that if you are reading this through a google search, you've probably already found them. I can't add more to them, but I will summarize my findings.

First things first, slabs. I was hoping I wouldn't be as enamoured in person. Or that the slabs they had weren't pretty slabs. Or that something else would jump out at me. Nope. This trip to the quarry made me want marble even more. It is just so beautiful in person. Directly comparing them to the quartz slabs we found there would be unfair. Quartz is a great material (one that we will be using at least in part) but to compare a man made, uniform slab to a gazillion year old piece of stunning metamorphosed stone just cannot be done. Here is the Venatino Marble (priced at $104/sq foot + $8/sq ft for honing + installation which ends up totalling $160/sq ft when all is said and done).


As expected, the staff there tried their best to warn me about marble. As expected, I was told I would have to sign a waiver. Unexpectedly, they apparently have only ever had one customer choose marble for the kitchen, and apparently it has been replaced by them THREE times (cue the now-in-effect waiver). I found this incredibly hard to believe because I think they are the biggest (if not ONLY) supplier of stone countertops in the city. But then again, my all white, marble heaven of kitchens is something I have yet to see in my year of perusing the local listings on a weekly basis, so maybe it is true. They did show me some "quartzite" (in brackets because I've read in quite a few places that most Super White or White Fantasy is not quartzite but in fact dolomite marble - not quite as soft but still an etchable marble) that I thought was pretty, less the "eggs". Someone, somewhere (through all of the blogs and forums I've read) referred to the round blobs of veining in this stone as eggs because they are egg shaped, and now that is all I see. I knew I didn't like the veining. It's not subtle and pretty like marble. But I thought I would give it a fair consideration and took a sample too. Super White/ White Fantasy "Quartzite" $114/sq ft + installation.


Okay, now on to the testing. I did tests on unsealed samples, on polished and unpolished, and on freshly, crappily sealed samples (I didn't let it cure for 24 hours, I didn't use the best impregnators on the market, just a run of the mill Home Depot sealer which is not recommended).

These are my findings:
1) Stains do not seem to be an issue in sealed marble. Sealing = no staining.
2) Etches are very real. They happen.
3) Etches can buffed out or visibly reduced by buffing out.
4) Throwing sharp or heavy things at your marble will create dings and scratches (things like other sharp stone samples, a heavy knife, a cast iron pan, etc).
5) If you want a "perfect" countertop that looks like the day you bought it, marble isn't it.
6) Nothing compares to the depth, beauty and life of marble. Nothing.
7) If you can embrace (not just accept) the perfect imperfections of marble's living surface, then you and marble are a match made in marble heaven
8) Honed marble is infinitely better for kitchens because it doesn't show etching nearly as much
9) Marble has been used as all sorts of surfaces from counters to tables to bars and stairs in Europe for centuries.

Other points to note.

  • Dont' throw stuff at your counters, marble or not
  • Honed marble is one of the only surfaces you can actually "refinish". Like a solid wood floor needs refinishing every so often, marble counters can definitely benefit from a surface refresh (unless you really love holding on to every bit of patina you can, then don't do this). 
  • Not only can marble be rehoned in place by a pro (rumour has it Martha has her gorgeous counters rehoned annually), but you can do quite a bit on your own. Some methods I tried on my samples (try at your own risk) are:
    • Wiping vingar or lemon juice all over to blend in etches
    •  Rubbing a thick mixture of baking soda and water into the stone
    •  600 grit wet sand paper
    • Comet and a Scotch Brite Scrubber
    • Haven't tried: professional marble etch remover
  • Once I really understood the nature of marble, I felt a little less angst. It's very much like wood floors. There are lots of alternatives like laminate and vinyl plank that look SO much like wood, but nothing really really looks and feels like wood except wood. Like marble, wood isn't "perfect". It can scratch (I once slipped in stilettos on my parents freshly done wood floors and left a huge gauge) and it can stain and swell from water. But it also has a warmth to it. It looks comfortable and beautiful at the same time. The scratches give it life and a story.
  • Quartz CAN scratch and it CAN stain. It's not indestructible, just a lot more durable.
I can say now my only reservations are the chipping around the sink from pots and pans (we cook two separate dinners every single night, which means double the dishes, and double the wear), and potential resale issues (not everyone will embrace the patina as I will).

But, I just can't imagine anything else in my kitchen. I can't let go it. I've dreamt of marble counters since I was a young teen girl enamoured with home decor magazines.

I will embrace the patina. I will still do my best to prevent chips by being careful when doing dishes (I'm sure to start I will put a tea towel around the rim of the sink), and I am sure I will try to blend in some etching every once in a while if something really sticks out, but I'm going to love every minute with those counters.

And what if we go to sell in a few years? I will get our counters rehoned to minimize the inevitable scratches and etching, and will cross my fingers that someone out there will appreciate them as much as I do (having a mostly white house, I feel like similar minded people will be the only ones attracted to it, but who knows!). And if not, if it becomes a big issue and we need to replace the island, we can either try and sell the top, bring it with us to the next house, or (and probably best case scenario) have it cut down into a few smaller pieces we can use for bathroom vanities and side tables.

So really... what have I got to lose?

And, I can't write this post without referencing these two testimonial blog posts that really helped push me back towards my beloved marble. It really has been accounts like this that have made this experience that much more - so thank you!

http://fortheloveofahouse.blogspot.ca/2013/03/marble.html


Designing a Home | Ongoing white marble kitchen dilemma

Designing a Home | Ongoing white marble kitchen dilemma

This is the post where I apologize for being the worst blogger ever, and beg for your help in making up my mind on certain house decisions. There are so. so. many. But I will start with a few. Thank you in advance.

Kitchen
By now you probably are aware of my love affair with white. Not many people here in Winnipeg get it, and many are worried that I'll tire of it. Nope. Nada. My admiration of a white kitchen started years ago - before we even bought our townhome in BC - and it has never faltered. So white on white on white it shall be! You may remember this post on marble because of my serious marble obsession, and my sadness over the reality that it just might not be the best material to use if we plan on not staying in this house for a long time. So now I'm committed to quartz counters. But, here is my dilemma: do I do solid white counters with a delicious marble backplash, or do I do the new Caesarstone Calacatta Nuvo (marble-looking) counters with a simple white subway tile backsplash?

I am SO torn and every day I change my mind. I would say I am 50/50 right now and I need some tipping in one direction.

Here are my thoughts so far on the options:


White Counters/ Marble Backsplash
Pros - Backsplash will make a nice statement and add some visual interest to the kitchen. This option also let's me bring in some natural stone into the kitchen design. The marble backsplash is the main appeal to this combo.
Cons - Not excited or in love with white counters although I do like them.


Marble-looking Counters/White Backsplash
Pros - More excited about this countertop option. It's a new product that looks so much more like marble than anything else out there on the market within our budget, and I spend most of my time in the kitchen looking at and using the counters, so it would be really nice to have pretty counters. Also, I like the fact that since there is some veining, any little crumb or drop on the counter during a party won't be screaming "I'm a dirty counter- clean me!" so hiding small messes is also a plus.
Cons - Still not sure if we can get this new product in time for our build. Also not sure if it will be too creamy against the whites that we've chose for the cabinets.

Okay kids, this is where I need your help! Please try and convince me one way on another!
Designing a Home | Exteriors

Designing a Home | Exteriors

Architectural changes are in! Now we just wait for our plans to be drafted and approved - eeeek!

We still have a couple months to work on the interior finishings, and to say it's overwhelming is an understatement. I thought I had a very clear picture of what I wanted - and then I realized I didn't. I would say I definitely lean towards a transitional take on the traditional/Cape Cod/Colonial side of aesthetics. Do my current surroundings reflect that? Not quite - but were I to build THE dream home (not that building this home isn't a dream, but let's be honest, we aren't going balls to the wall crazy with this house), it would be full of mouldings, wainscoting, coffered ceilings, and arch ways. Not to get too stuffy, I would balance all of these things off with transitional pieces and a variety of eclectic yet perfectly selected furnishings and accessories. And, because everything would be mostly white, it would blend together in harmony. Or at least that's what I think would happen in my head.


In reality, the home we are building won't be like this one. I wish it were, but it isn't. The style of homes here are definitely very different than what I'm used to. It's funny how regional differences dictate housing styles. My family in Ontario live in a subdivision where every. single. house. is red brick. It's crazy! Here, the predominant exterior finish is stucco. And not the stucco I'm used to back home; not the stucco that adorns my parents 20 year old home. The stucco here is very chunky (larger chunks of concrete). It's also very light, and absorbent. One day I will do some research as to why it is so different. My parents is painted and has finer pieces of concrete in it. Come to think of it - all the houses on their street have painted fine stucco in different colours. But in Winnipeg, the regular stucco can only be tinted, and to a very very light colour, so light grey, light beige, light salmon (yuck!) etc. It also shows "wet" marks when it rains, which again confuses me. At least it rarely rains here!

Okay, back to our house. In selecting our exterior elevation, we not only were limited to the styles the builder offered, but also to our budget, as well as to concern for the neighbourhood. We were set on the first option below, the more traditional of these two elevations (except not in yellow) until the DAY before we had to lock in which one we wanted. We originally didn't consider option #2 because of the stucco - but I guess we have been here long enough and seen enough of it that the distaste has worn off a bit.

It was a difficult choice, but Winnipeggers are gaga for modern. We felt the more modern home would fit in better on our street (which has some supersized, custom, modern homes to be built on it), would likely be better for resale, and despite my love of traditional looks, I just ended up preferring the second option more. Which is crazy. Also, the bedroom windows are over a foot larger (no cost) and the house is also a wee bit larger (no cost), so that kind of nudged the pendulum over further.


So here it is! I thought it would get easier now that the BIG things like floor plans and and structural things were sorted, but I'm almost more confused than ever. Do I have to do an uber modern interior to go with this exterior? Or can I still get away with some of the traditional elements I love (like wainscoting) etc? HELP!